
Essential Gear and Packing List for Kilimanjaro
Knowing what to pack and getting the right gear, clothing, and equipment for your Kilimanjaro packing list is critically important to a successful climb. The last thing you want is to find out after you’re already there that your backpack isn’t large enough for what you’ll have to carry during the day or that your sleeping bag isn’t designed to withstand the temperatures on the mountain or that the solar powered charger you got is actually the crappy one.
NOTE: This is part 4 of a multi-part blog series on climbing Mount Kilimanjaro. Be sure to check out the other parts detailing various aspects and phases of our preparation, trip logistics, and the climb, all linked at the end of each article. And definitely don’t miss the vlogging video compilation at the end.
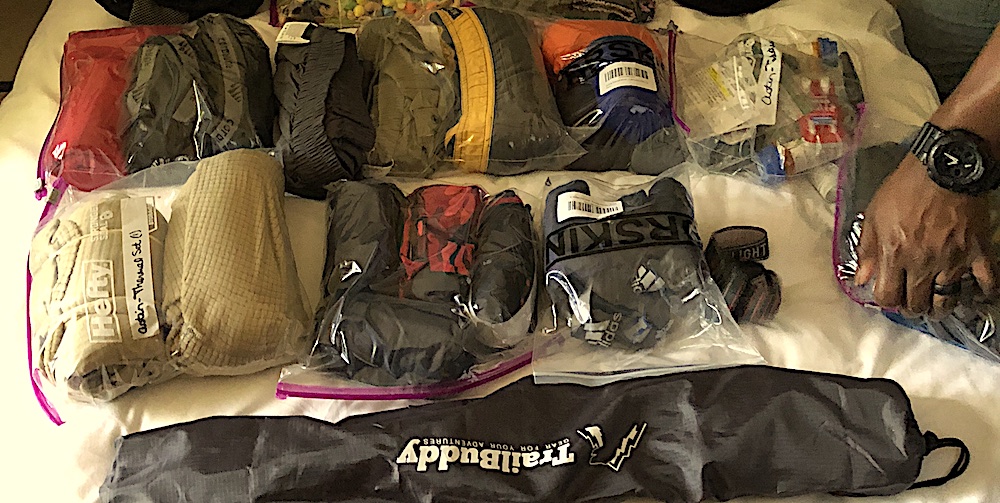
So here’s the list of essential items that everyone who attempts to climb Mount Kilimanjaro should have with them on their journey, plus a few more things that you won’t read about elsewhere but which will make your trip a hell of a lot more comfortable and enjoyable.
And one quick pro tip before you start reading through this thorough list – bookmark this page now. I promise you’ll want to refer back to it as you’re getting your gear and supplies collection together and you’ll be glad you saved it as a comprehensive reference.
Ok, here we go…
Primary Kilimanjaro Packing List Gear Requirements
These are the must-haves on any packing list or gear checklist for a summit of Mount Kilimanjaro. Your guides are actually required by Kilimanjaro National Park rules to check and inventory your gear before the climb, so carrying these items are non-negotiable, unless otherwise noted below.
Luggage and Bags
Large duffel bag – This is for anything and everything you’ll have with you on your trip that you won’t need during the daily hikes. The majority of your climbing gear, changes of clothes, equipment, toiletries, etc. will be packed into this bag and carried from camp to camp daily by the porters. But you also want this bag to have wheels and roll because you’ll be carrying it yourself to and through airport departure and arrival halls before and after your climb.
Here’s MY FAVORITE rolling duffel for this purpose, but since there’s so much to consider when selecting one of these, here’s a whole post just on selecting the right duffel bag for the trip.
Small luggage locks – These are used to lock up the zippers on your duffel bag daily and also for any bag you chose to leave back at the hotel. While it may seem like an insult to the porters and hotel staff to put locks on the bags you leave with them, trust me – they prefer that you lock up your stuff too. It makes them feel more comfortable because no one can accuse them of taking anything out of anyone’s bags, and they know that no one else can get in there either. It’s just best for everyone all around.
These are literally the exact ones I use because they come four to a pack, the ring is small enough to fit through the tiny holes in zipper tabs on luggage, and if you lose a key or two the other keys will still work on all four. They’re also TSA-approved if you want to use them while in-transit too.
Day-use backpack – The backpack you’ll carry yourself on the daily hikes should have a 25-35 liter volume and be large enough to at least carry two large bottles of water, a lunch pack, snacks, a raincoat, an extra layer of clothing, and anything else you might want to have access to during the daily hikes. Something with some lower-back support or a waist strap would be even better, but not one with extra metal parts in the bottom because that just adds unnecessary weight.
This one is my favorite because it’s ultra-light weight and comes in so many color options, while this is a really cool Speedo-branded option that also has lots of styles to choose from. Both are 35-liter backpacks. For those who want a little more room, this 40-liter option is a really solid choice.
Sleeping Gear
Sleeping bag – Don’t make the mistake of bringing or buying just any old sleeping bag for a trip like this. You’re going to need one that is specifically designed and rated for cold-weather camping. Even if you’re sleeping in the huts on Kilimanjaro, it can get extremely cold at night and most normal sleeping bags aren’t rated for such temperatures. This is not something you want to cut corners on either. Get a good one with the right design and rating, or else you’ll be freezing at night and unable to sleep.
This is one of the best sleeping bags you can get. It’s tapered or mummy-style, so your body heat gets trapped in a smaller area which keeps you warmer. It also has a head covering and it’s rated to function in temperatures as cold as a whopping –40 degrees Fahrenheit (which also happens to be exactly minus 40 degrees Celsius too, the strange point at which the two measurements cross). This is also another really good one, and it’s rated for –20 degrees Fahrenheit (negative 28 degrees Celsius), which is perfectly suitable for Kilimanjaro nights too.
If you’re a tall dude or dudette, you might want to get a sleeping bag that has a little extra length to make sure you’re not hanging out of it. This tapered extra long sleeping bag is rated for 0 degrees Fahrenheit (negative 18 Celsius). And speaking of big and tall, if you’re either a larger individual width-wise OR you just like to move around in your sleep and want some extra wiggle room, this wider sleeping bag is a great option for you. At 10 pounds, it’s only slightly heavier than the others (the other three are each 8 pounds) and it’s rated for temperatures down to minus 10 degrees Fahrenheit (negative 23 degrees Celsius).
Clothing
Heavy waterproof outer jacket – You’re only going to need to put this on for the final ascent, but boy are you going to need it when the time comes! Don’t bother trying to get one looks slim or fitted either. You want this to be bulky and heavy. Keep in mind that you’ll be wearing at least 3-4 other layers underneath it too, so even going a size bigger than normal might be wise. Two of my favorite for this purpose are the OutdoorMaster 3-in-1 ski jacket (women’s version here) and the Camel Crown ski jacket (women’s version here). Both are waterproof and will protect you well from the elements at the top.
Heavy waterproof outer pants – Also for the final ascent, you’ll need a set of heavy waterproof pants to go over the other few layers of pants you’ll also have on. These Columbia Bugaboo II waterproof ski pants work great. The men’s version of them are here and the women’s version of them are here. Just remember that you may want to consider a larger size since you’ll be wearing at least one more pare of pants underneath these in addition to thermals.
Mid-layer jacket – These are somewhat new, but the best option for your mid-layer jacket without question is this AMAZING waterproof/windproof HEATED down jacket from Conqueco!!! (Women’s version available here too.) This bad boy has a chargeable heating device built right into the jacket and one charge can last 10 hours (way more if you’re running it on low heat). That’s going to provide you with more than enough time to stay warm on your final ascent to the summit, where you’d otherwise be freezing your ass off even with multiple layers of heavy clothing on (trust me!!!).
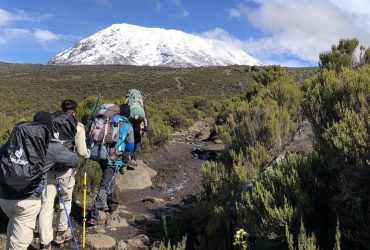
Base layer shirts and hoodies – In addition to your heavier outer layers that are more specialized and geared towards the final ascent, you’ll also need some regular shirts and a hoodie for hiking on the lower-altitude days. Remember that Kilimanjaro starts out as a rainforest at the bottom and transitions through several more climate zones, each getting chillier and windier as you go up, culminating in the snowcapped Uhuru Peak at the summit. You’ll probably want to have t-shirts and/or very breathable long-sleeved shirts for your first day or two. Then you’ll want to switch to a sweatshirt or hoodie later on before donning your heavier outwear later for the final ascent. Since base layer shirts and hoodies aren’t specialized great, there’s no need to recommend anything specific here. Just the a few shirts and a sweatshirt or hoodie that you already own will be sufficient to bring.
Thermal skin layer – You will, however, want to acquire a special set of skin-tight (but still breathable) thermals for use on the final ascent. This includes an upper body thermal plus a lower body thermal. While you can pile on the upper layers pretty easily under a big heavy jacket, it gets a little harder to put on multiple pairs of pants while staying mobile and flexible for the final climb. That’s why this skin-tight, flexible thermal layer is important. it allows you to effectively have 3 layers on (thermal pants, regular pants, outer waterproof ski pants) without the stiffness and loss of flexibility that would come with wearing two pairs of pants underneath your outer ski pants.
I really like this pair of thermals (women’s version here) a lot because you can re-use them outside of the one-time climb for things like running, gym, sports, etc. once you’re back home. I also love this pair of thermals too (women’s cut found here) because it has a wider neck line, which can be quite nice if you don’t like any hint of tightness around your neck and want to keep the bottom layer away from the neck for greater comfort.
Waterproof multi-layer gloves – As you summit Kilimanjaro, you’d be surprised by how cold your hands can get, even if they’re well wrapped. Your outer glove layer will need to be waterproof, but you’ll want it to be large enough to be able to fit another more fitting pair of gloves on your hand inside of the outer gloves. Most people who ski and snowboard or just buy regular heavy winter gloves will buy them to fit their hand, not to fit their hand while it’s already inside of another glove.
For Kilimanjaro, though, you’ll want to either get a set of waterproof outer gloves that are a size larger than you would normally wear so that you can put your already-gloved hands inside of them, or you’ll want to get a set of two-part gloves specially designed for extreme cold temperatures that already include the second set of inner gloves. A set like these waterproof OutdoorMaster ski gloves includes two sets of gloves in one – the waterproof outer set and a removable inner set that is already designed to fit inside of the outer gloves.
Balaclava – If you don’t have one of these left over from your ninja days, you’ll need to order a balaclava head and face covering as well for the final ascent. This may seem like overkill, but trust me – it’s not! You’ll be so thankful you brought it when you’re up there.
I personally like this particular one because it has a mesh front that allows for more breathability while still protecting the front of the face from cold and wind. I don’t like breathing in enclosed spaces, and this one tends to make my face a little less claustrophobic. But even if you get one like this, it’ll be totally fine too. It’s only for the final ascent. If you want something a little more fashionable or different, you can go for the likes of this one or even these colorful ones, although these tend to be slightly thinner.
Gaiters – I usually say that these are unnecessary, especially if you have good ski pants that have elastic and/or straps around the bottom of them for tightening them around your boots and ankles. But some people insist that you should bring them. If you do, don’t get the big high ones that are usually used for fishing or wading into flood waters to rescue kittens. Get these simple ankle gaiters. They’re cheap and the’ll do the trick of keeping snow or water from kicking up into your pants and boots.
Neck warmer – This isn’t really necessary either, but I actually am a fan of neck warmers like this because they adds an extra layer of protection and insulation around an area that otherwise sits at the intersection of several pieces of clothing and isn’t often insulated as well as other parts of the body. The neck also hosts a lot of blood flow and keeping it warm can help preserve the warmth generated in other parts of the body as well.
Shorts – You’ll want a few pair of shorts for your first few days of hiking, and these don’t need to be anything special. Whatever you like wearing for normal outdoor sporting activities like running or hiking will be fine for this purpose for the first few days until it starts to get chilly enough that you’ll want to switch to pants.
Hiking pants – You’ll also want to have a pair or two of pants that are comfortable to hike in as well. You’ll break these out when it gets a little chiller on the mountain a few days in, and you’ll also want to wear them underneath your waterproof ski pants and over your thermal pants layer on the final ascent day. So make sure your regular hiking pants are warm but flexible. But you don’t want them to be bulky, otherwise it’ll be harder to put your ski pants on over them later.
A pair of running pants like these would be good as long as they’re not too tight (remember you’ll wear your more fitting thermals under them for the summit day). Alternatively, many people like to have pants like these instead that zip-off into shorts. Whichever floats your boat will be perfectly fine.
Regular underwear – Nothing special to say here. Just bring enough regular underwear for each day you’re there. In fact, what I personally really like to do when I travel – especially when I’m doing something really outdoorsy and active – is to get a pack of cheap underwear and just dispose of them each day when I’m ready to change. That way you don’t have to bother with carrying around dirty underwear when you can just throw it away.
If you think about it, underwear when bought in a pack at Walmart or Target, costs less per pair than a soda or cup of coffee or redbull or a bottle of water. Most of us will regularly one or two of those – or something similar – a day and think nothing of it. So for the cost of one bottle of water or one Coke Zero per day, you won’t have to deal with carrying around dirty underwear during your trip, nor with having to lug it all the way back to the US to wash and reuse it.
If you’re bringing your best Calvin’s or some Pradas, ok maybe you can take those back. But I certainly wouldn’t. For things that are cheap and disposable (underwear, toothbrushes, etc.), a good track hacking tip is to buy them cheap and dispose of them along the way instead of carrying them around dirty.
T-shirts – Same deal here… nothing special to say about the t-shirts you bring. Just bring enough t-shirts to wear on your pre- and post-climb days (Tanzania is generally warm-to-hot, so you’ll likely be wearing t-shirts every day except when you’re high up on the mountain) plus most of the days you’re on the mountain.
To be honest, I actually sometimes do the same with t-shirts as I do with underwear when I travel… I buy cheap shirts for $2-5 and dispose of them on the road when I get tired of carrying them around. That’s a little too jetset for most people, I know, even if they are that cheap. But just another travel hack I wanted to share, especially when you can fine stylish colored t-shirts for $2 or $3 on clearance on occasion. We spend thousands of dollars on trips, yet carry around dirty clothes for weeks sometimes just to save two or three bucks. To each his or her own, right?
Sweatshirt and/or hoodie – Nothing spectacular to report here either. Just a favorite sweatshirt and/or hoodie or two from home will do just fine. You’ll probably want to put one of these on as you get about half-way into your climb and the temperatures start dropping a little during the day. You may also want to sleep one of these each night, since nighttime temps can drop a lot even when it’s warm during the day. And finally, you’ll also want to put one of these suckers on as yet another extra layer during the final ascent. Piling on 4-5 upper body layers isn’t uncommon at all for the final ascent, and a sweatshirt or hoodie will do great as one of the bulkier mid-level layers that can accommodate another layer or few underneath without being too tight.
Rain poncho – This will be critical in the likely event that it starts to sprinkle or even downpour at some point during your hike. While the normal hiking seasons are designed to technically correspond with the “dry season” on Kilimanjaro, it is still common to get an occasional shower or two on the mountain even then. You’ll also want to pack this bad boy in your backpack daily and have it easily accessible in case of a sudden deluge.
There’s no need to spend a lot of money on this or to go all out, but you do need to get one specifically designed for hiking with gear and not just for sporting events or everyday use. Anything that has a hood and is large enough to cover both your body AND your full backpack while drooping low enough to cover most of your legs will be perfectly fine. Just make sure you try it on before the climb so that you’re not stuck with something that is too short when it has to cover your strapped-on backpack too.
While some blogs and sites will just say “raincoat or poncho,” I don’t even bother with the raincoat part because those are designed to only fit over your body, not your body while you’re also wearing a bulky backpack on your back. If you only have a raincoat, it’s not going to close if you try to cover both your body and your backpack. But if you just get a poncho that’s only designed to cover a person, for example the ones people use at sporting events or theme parks, it’s not going to have the extra fabric either to cover the extra bulk of your gear. That’ll mean the back park will be a lot higher than the front and your shoes and lower legs will still get soaked.
A multi-functional poncho like this one or this one is ideal because it comes down lower in the back so that it’s still even with the front if you’re wearing a 25- or 30-liter backpack like you’ll have with you on Kili. These can also be converted to use for other purposes too, including makeshift tents and ground coverings to sit on.
Footwear
Water-resistant hiking boots – Ok these suckers are super important, but they can also get outrageously expensive too. Also, there are just so many options and styles out there that many people honestly just don’t know what to believe in the end about what they really need. I strongly recommend balancing 4 factors in picking a good pair of hiking boots for Kilimanjaro’s terrain – comfort, height, material, and price.
For the first, you’re obviously going to want to have a pair that are comfortable. As long as they fit your feet and aren’t too short or too narrow, you should be able to break them within only a few days be good on comfort. Just try wearing them around a few times before your trip so that they’re not brand new or never worn on your first climbing day.
For height, you’ want a modestly high-top boot but not one that’s too high. One that’s too low can allow dirt, pebbles, and/or water to kick up into your boots and socks and cause discomfort, blisters, and/or delays because you have to keep stopping to empty them. But a boot that’s too high can make you feel like your ankles are too restricted and might chafe your lower legs. There are low-cut, medium-cut, and high-cut hiking boots, and I strongly recommend a medium-cut boot.
For material, you’re going to want to get a pair of boots that are at least water-resistant. It can be hard to find fully water-proof hiking boots that aren’t super heavy and clunky, so a higher level of water-resistance can work just fine too. Also, some leather on the exterior is fine, but you’ll want to avoid a boot that’s all leather. It’s just too easy for leather to get water-logged and scuffed up, and you don’t want to invest in a good pair of boots and not be able to use them again for other purposes. Boots with Gore-Tex and other synthetics are ideal, and some leather is still ok.
Here are three examples of hiking boots that I’d recommend as suitable the demands and terrains of a Kilimanjaro climb. The first is an upper-mid-priced, mid-cut, waterproof boot that I absolutely love. These will be a solid choice that you can take back home and reuse in a variety of circumstances. The second is a very cheap option that still provides decent support and insulation, although it may be more suitable for one-time use (or use-and-donate there in Tanzania, as I’ve done with cheaper boots after use). Just note that the lower-cut fur-lined options won’t be good enough for you. The third is a top-of-the-line rubber/leather/Gore-Tex boot that will be both light and tough. In addition to being quality, I personally also like the styles available in this boot.
Regular running/tennis shoes – These you don’t need to go out and buy anew unless the only pair of running or tennis shoes you have at home are super expensive and you don’t want to risk ruining them. In that case I’d go out and buy a comfortable but inexpensive pair that you don’t mind getting dirty.
Regular socks – Like underwear, I personally like to buy cheap socks for travel that I can dispose of along the way and be burdened with excessively dirty or smelly laundry to lug around the world. But if you’re not down for that strategy, just bringing a pair of socks for each day of your climb plus a few extras in case you get a pair or tow wet will be just fine.
I personally like to wear low-cut socks with running shoes, so I bring a combination of half low-cut socks for when I’m wearing shorts and running shoes and half higher-cut socks for when I switch to pants and boots. Remember, these are in addition to the couple pair of thermal socks you’ll want to have too.
Thermal socks – While the regular socks you probably usually buy and already own are most likely a majority cotton blend, you’ll want to have at least a pair or two of majority wool blend socks for a trek up Kilimanjaro. That’s because cotton retains too much moisture and can remain damp longer that you want, while wool is breathable and more comfortable. Regular socks will do just fine the first few days, but after that you’ll want to swap those out for a good pair of thermal wool socks. For the final ascent, you may even want to wear two pair for extra warmth.
While some may tell you that one pair of waterproof socks is necessary for a Kili climb, I don’t think they’re necessary at all. In fact, they’re more expensive and feel really awkward and strange to put on. If you’re not used to wearing these hybrids, they may be really uncomfortable and not worth the extra effort. Just a good pack of 2-3 thermal wool socks like these or these will do the trick just fine. These will also feel really cozy to wear in your sleeping bag at night too for extra warmth.
Headgear
Hat with a brim – I’m not a huge fan of the explorer- or archaeologist-looking safari hats that have brims all the way around them or the drape cloth that comes out of the back, but those are honestly the best hats to take on a Kili climb to to protect your head and neck from the sun. If you’re like me and opt for a baseball cap, make sure you also make a plan for the back of your neck. I bring along a very light scarf and wear that with my cap just because I prefer that combo style-wise. But regardless, you’ll want coverage for both your head and neck in whatever headgear arrangement you go with.
These are the most ideal head coverings here, here, and here, each containing a full or wide brim and a neck flap for maximum protection. But you’ll most likely find me in a regular baseball cap and a very thin infinity scarf like this or this.
Headlamp – You’ll need one of these if, like most people, part of your final ascent to the summit of Kilimanjaro will include early morning dark hours. It may seem like overkill, but they are very lightweight and provide essential path lighting on the part of the climb where you’ll need it most. There’s no need to spend more than 10-15 bucks for a decent headlamp.
Sunglasses – This might be obvious, but it’s necessary to include on the list of required gear because it’s, well, required. You’ll absolutely use these on your trek, but no need to waste money on anything high-tech or expensive. Your favorite pair of sunglasses from home will work just fine. You might also want to wear these on the final ascent too instead of ski goggles if it happens to be snowing while you’re up there. Some people recommend bringing ski goggles in case you need eye protection from snow, but even when I’m skiing head on into falling snow I still prefer a good pair of fitted sunglasses over ski goggles.
Additional Supplies and Accessories
Thermal water bottle – You’ll need to carry at least two 1-liter water bottles with you in your day pack each day while hiking up Kilimanjaro. But don’t think you’ll be able to just buy two large bottles of water there and use those as your water bottles. Disposable plastic water bottles are not allowed on Kilimanjaro and if park staff catch you with one, you guides can get into trouble.
You’ll need to bring reusable (not disposable) water bottles for your daily water supply, and at least one of these should be a good quality thermal or insulated bottle. That’s because once you get up within a few hours of the summit, it’s common for the water in bottles that are not properly insulated to freeze, even if inside your backpack. That means you could get near the top and really need hydration, but only find a solid block of ice in your bottle. That’s not good, because you’ll really be needing some H2O about then and you need it to still be in liquid form for consumption.
Most insulated water bottles tend to be smaller in size and capacity, but you’ll need something close to a liter. A liter is about 33.8 fluid ounces, and 32 ounces is a common bottle size that’s close enough. A great 32-ounce thermal water bottle is this one, which is only about 20 bucks. What’s even better is that you can upgrade to the 40-ounce version for only 5 bucks more. I like that option, since it lets you carry more than a liter of water in one bottle and the extra size is really negligible.
Don’t forget that you’ll still need a second liter-sized water bottle though, and some people even recommend carrying three. If you carry one thermal bottle and one non-thermal bottle, you’ll just need to wrap your non-thermal one up really well in clothes inside of your backpack for the final ascent. It still may freeze, but that’s the best you can do to try to prevent freezing and at least you’ll still have the water available in the thermal one. Otherwise you may want to consider just going with two thermal bottles to make sure you have a maximum water supply available on the final ascent.
Collapsable ski poles – You might think this sounds like overkill, but you are really going to want a pair of these when you get to the rockier terrain. They really do help a lot with balance, especially on your last two days ascending. If you already have ski poles for skiing, you may be tempted to just use those. Don’t though, unless they’re collapsable. You want them to fit easily into your luggage for travel and into your day backpack for storage when you want to put them away. Non-collapsable poles won’t fit.
These carbon fiber poles are ultra-lightweight, durable, and collapse down to about 26 inches (65 cm). Here’s another set of very popular poles that also collapse down to 26 inches (65cm) and come in a variety of colors too. And finally, this one is my favorite because it collapses down to just 14.5 inches (36.8cm) and it’s made from a mixture of carbon fiber and aluminum alloy. But that last one doesn’t come in a set, so remember to order two of them!
One like this that runs on 3 AAA batteries will work just fine, as will this one that’s USB chargeable. Both of these provide around 160 lumens of light. If you really want to go all out and bring some stadium lighting to your climb, this 12,000 lumen headlamp isn’t that much more expensive, although it does have its power supply in the back and a cord connecting to it around the side, which some may find annoying. Other versions of headlamps that are this bright include a plastic shaper piece that can cause a lot of irritation and annoyance, so do avoid those.
Flashlight – You’ll also need a regular ole’ flashlight too for two reasons. First, you’ll need the extra hand-held lighting during the dark hours of the final ascent. And second, you’ll want to use it when you’re navigating your way to the latrines (if you’re doing the Marangu route) or toilet tent (if you’re doing any other route) in the middle of the night when you have to pee. Trust me on this one.
Towel – You’ll want to carry one towel with you for several purposes. First, if you want to try to take a makeshift “shower” of some sort (it’ll most likely have to be a baby wipes or sink shower though), then you’ll obvi want a towel for drying off. But you may also want to use the towel to wrap an item or two in your luggage while in transit and even on the mountain. As long as you have it, it wouldn’t hurt to wrap up anything that might crack under weight, like your headlamp or ski goggles (if you decided to bring them) or your laptop (if you’re like me and bring one up the mountain for blogging and evening entertainment purposes). You can also use your towel to wrap your water bottles inside your backpack for the final ascent, during which bottles that aren’t well insulated often freeze, leaving the bearer without a usable water supply when it’s needed most.
While some folks recommend you buy and bring one of those ultra-lightweight, quick-drying towels, I say that’s not only unnecessary but actually less helpful for the potential uses described above. Those super thin towels don’t provide any padding for anything, no insulation for wrapping water bottles, and don’t even really dry you off well to begin with. The only thing they have going for them is that they dry quicker, but you’ll always have a full night for towels to hang and dry anyway so you don’t need to sacrifice the other use cases and spend extra money on this sucker just to have it unnecessarily dry in one hour instead of a few hours anyway.
Toiletries – Ok this is the same for any international trip. It’s ok to bring all of your regular grooming and primping supplies, including for teeth, hair (gotta look good for all those amazing selfies on Kilimanjaro!), deodorant (although you’ll be amazed at how little you sweat there), shaving supplies, etc. If you’re doing the Marangu route, you’ll have access to running water at the camp sites, so things like shaving and brushing your teeth will be easy.
Sunscreen – This is super important. Not only is Tanzania very close to the equator, which means closer to the sun, but as you ascend Kili you are literally climbing even closer to the sun with every step. If you’ve never been to the equatorial region of the planet, you may not realize how much of a difference the curvature of the earth combined with elevation can make in terms of sun exposure, but trust a brother when I say it’s significant. You’ll want a high SPF sunscreen, and you may even want to bring a little extra for the inevitable friend who asks you to borrow some.
Chapstick with sunscreen – This isn’t super critical, but recommended. It’ll get drier and more arid as you ascend, so you may experience some dry lip to begin with. And since the sun will be more intense, it doesn’t hurt to use a chapstick with an SPF factor too for added protection. Since the skin on the lips is so thin and sensitive, any burn or crack on them can be a real pain in the… lip.
Ziploc bags – It’s a good best practice on Kili climbs to get some gallon-sized Ziploc bags and bring them along to use for organizing and waterproofing your stuff. While it’s not absolutely necessary, since the porters carrying your gear up the mountain will wrap your duffel bag in plastic for the daily haul, some people like to put anything from a few things to everything in large Ziploc bags for organization and extra protection. Even if you’re not that ADD, you’ll be glad you brought a few along so just grab some of any size out of the kitchen and throw them in your bag.
Toilet paper – While the Marangu route has latrines or outhouses at each camp site and on the other routes tour companies usually bring along and set up “toilet tents” for climbers, you’ll need to BYOTP. Bring at least 2-3 rolls in case you end up having stomach problems at some point and need extra. This is also an item you’re going to want to seal inside of a Ziploc bag to ensure your rolls don’t get wet under any circumstances. After all, what good is soggy toilet paper?
Baby/body wipes – You’ll want to bring a pack of both regular baby wipes and antibacterial wipes with you on the climb. You can use the regular ones when you start feeling too icky and want to take a “Kili bath.” The antibacterial ones you can use to wipe down anything you want to sanitize, including your hands from time to time. Before meals you’ll have soap and water for what the guides and porters hilariously call “washy washy.” But at other times you may find yourself just wanting to sanitize yourself or your surroundings for good measure and these are great, quick, and disposable.
Insect repellant – I’ve never found that bugs are a huge problem on Kili, but others have had different experiences with these. Perhaps I’m just not as tasty. Regardless, you’ll want to bring along a small can of insect repellant in case you notice yourself becoming extra attractive to the native creatures.
Medicines and First Aid Supplies
Over-the-counter medicines – Creating your own little OTC medicine kit is a wise idea for a Kili climb, since you never know what’s going to happen and how your body is going to react to food, weather, stress, etc. Your portable medicine cabinet should include your preferred medicine for headaches, diarrhea, upset stomach, colds, and allergies. Also get a small tube of antibiotic ointment and a small bottle of eye drops just in case.
Small first-aid kit – Similarly, you’ll want to grab one of the cheap first-aid travel kits that you can find at any pharmacy, Walmart, or Target in the travel supplies section. Your guides will have their own more comprehensive first-aid kit as part of their required gear, but it’ll be nice for you to have your own set of a few bandaids, medical tape, etc. for the small stuff you may encounter, such as the occasional small cut or blister. You might also want to get a package of blister pads and throw it in there too.
Water purification tablets – Your porters will supply you with fresh purified water each morning for your water bottles, but it’s still a good idea to have a dozen or so water purification tables on hand in case you run out of water and need to obtain some from a natural source during a hike, or just in case you have questions about the purity of the water available at the camps. These usually come in excessive packs of 50 or 100 or even 200, but as few as 20 or 30 will be more than enough for even the most hypochondriacs. I’ve never even used them, but I still recommend taking some along for the trek. These in the bottle or these in the pouch are perfectly suitable for any such emergency.
Prescription medicines – As long as you don’t have any of the medical conditions that would prevent you from taking it, you should obtain a prescription for acetazolamide (brand name: Diamox) from you doctor in order to help prevent “altitude sickness” on your climb. Altitude sickness is really a misnomer because it makes the condition sound like you just get “sick” from the altitude. In reality, altitude sickness should really be called “brain swelling sickness” because it’s a lot more serious and dangerous than just feeling nauseous and throwing up.
Kili guides are specially trained to spot the signs and symptoms of altitude sickness, and they’re constantly on the lookout for them on a daily basis. I’ve literally had them come up to me from behind and start doing a check because I was walking sideways and they thought I might be experiencing dizziness. In reality, I was just being a clumsy idiot. But the point is they’ve got your back and they’re watching like a friendly hawk for this, and the minute they noticed something they swoop in to check on you.
Diamox and acetazolamide are great and highly recommended for climbers, but for those who cannot take Diamox a specific dosage of daily ibuprofen may be an alternative for you. Bottom line here is that you should talk to your doctor and ask him or her for a recommendation to prevent altitude sickness on your upcoming Kili adventure. (For more on what vaccines you should get prior to your trip, check out this article here all about Vaccines for Kilimanjaro and Tanzania.)
Non-Essential Kilimanjaro Packing and Gear Recommendations
You could also title this additional list below “Other stuff I would strongly recommend from experience but which isn’t required for a Kilimanjaro gear and packing list.” Shockingly, I didn’t see many corners of the interwebs talking about or recommending these things for a Kilimanjaro packing list, but once I got underway I realized that they could really have made the experience a whole lot better. Consider at least a few of them to make your trip smoother and more comfortable.
For Access to Civilization
Solar charger – If you do see others talking about taking a solar charger on a Kili climb, they’re usually recommending that you rent one on the ground in Tanzania. However, renting one is a really bad investment, which I found out after the first two I rented. You can literally buy one for the same price or less. Suppliers in Moshe know that solar chargers still seem sort of exotic and we assume they’re expensive, so they can get away with charing you the full cost of the product for a one-week rental. Don’t be a dumb as I once was… ok twice was.
There are two main types of solar charges – the foldable flat ones and the chunky clunky ones. In my experience, the chunky clunky ones don’t work nearly as well as the foldable flat ones and I have no clue why. I’ve had both and I’ve had friends that have had several of the chunkies, and they ended up borrowing my foldable flat one that worked because none of our chunkies worked. They weren’t even from the same places either. Mine were rented in Tanzania and my friends bought and brought theirs from the States. But still, the foldable flat ones are the solar charges that I’ve had the best experience with.
The foldable ones also have more surface area for sun absorption and can be placed at better angles, especially on top of and draped over a backpack while you’re hiking. This simple and cheap one is by far my favorite because it’s light, flexible, and it just works. It can generate 21 watts and charge 2 devices simultaneously, although somewhat slowly. Plugging your phones and other devices into the sun isn’t like plugging them into the wall, so you have to be patient and let them charge over a long time. But having any portable power out in the middle of BFAfrica is still amazing. If you want a little more juice, this one gets you 28 watts for only a little bit more doe.
For Personal Comfort
Vaseline – This seems random, I know, but it can come in handy if you encounter any problems with chafing during your climb. Your boy areas, your girl areas, up there, down here, wherever you might chafe after hiking more in a day than you would normally probably do in six months, this might just be your saving grace. Just a small travel-sized tub of it will be fine… just. in. case.
Toilet seat cushion– Ok, now I know you’re like WTF, right? I know it seems like overkill, but look – a simple cheap foam (not a hard material, but a soft, light squishable foam) toilet seat cushion from Walmart or Target or Big Lots or Toilets-R-Us or wherever you can find one will become one of the biggest reasons you’ll say “Ok, that dude who recommended this is a genius” right after the first crap you have to take in a nasty cold latrine without anything to sit on.
Yes, there are “toilets” at the Marangu route campsites, but they do not have real toilet seats. And a BYO-TS is not heavy and doesn’t take up much room at all in your luggage. Just stick it in the bottom of your bag and pack over it and you’ll never even know it’s there. A TSA dude or two might be like “say huh?” when it goes through the scanner, but your ass will later be like “I freakin’ love you” for indulging yourself in this one odd little bring-along for your comfort while doing your business. They also wash up easily, so you can easily clean the side that touched the gross wooden or metal seat-less “toilets,” wrap it up in plastic, and continue on your merry way.
Again, you don’t have to bring this. It’s not required. But just don’t come asking to borrow mine after the first time you have to take a crap out there and think, “Damn, I wish I’d have brought that ultra-light, easily packable, foam toilet seat cushion about now.” Just for shits and giggles, here’s one on Amazon that would work. Or you can buy a toilet seat with foam cushion bottom part and just detach the lid and bring that. It’ll work just the same.
For Being MacGyver
Duct tape – Make MacGuyver proud. Duct tape is the solution to a lot of problems you might encounter on Kili, or just during adventure travel generally. Bag rips at the airport? Duct tape the sucker until you get where you’re going. Water kicking up into your pants? Duct tape your pant legs around your ankles. Your toilet seat cushion from Toilets-R-Us ripped? Duck tape to the rescue. Your friend won’t shut up one day? You know what to do.
A small roll of duct tape can be really handy on a trek like this. So just grab a roll and throw it in your bag and forget about it until you have that odd situation where you think “Man, I wish I had some duct tape about now.” Then you’ll suddenly realize… you do.
For Sleeping
Sleeping pad – You can file this one under unnecessary creature comforts, but still many campers and overnight hikers like to carry sleeping pads for added comfort in their tents or on their hard camping beds at night. On Kilimanjaro, only the Marangu route has constructed wooden huts with built in wooden beds and vinyl mattresses on them. Climbers on all other routes might seriously want to consider a sleeping pad in order to ensure they get a more comfortable night’s sleep each night.
Sleeping pads do two things for you actually – they provide cushion and comfort to sleep on and they keep you warmer at night by trapping and storing additional body heat that would otherwise escape. Some people get sleeping pads just for the added warmth they can provide, especially in high-altitude places like Kilimanjaro, even if they are sleeping in the huts along the Marangu route.
This is one of the most highly rated and talked about sleeping pads for sleeping in high-altitude environments, but I’ll tell you right off the bat that it’s not my favorite because of the cost. However, it’s everyone else’s favorite because of it’s intersection of being ultra-lightweight and providing a fairly high heat factor. This is a much cheaper version that still provides decent support and decent heat. And this one makes my list of favs because it’s self-inflating, even though it’s a little bulkier.
Pillow – And finally, finally… file this one under creature comforts too, but one you might be glad you spoiled yourself with. We often don’t think about what we’re going to rest our head on when we’re thinking about what to pack for a major trek like Kill. We’re thinking instead about the sleeping bag to stay warm and the Diamox so our brains don’t explode and the backpack and luggage sizes so we can cram everything in. But a simple, small pillow of some sort is well worth the extra bulk. Hell, it doesn’t even need to be bulky. Just get one of those little blow-up travel pillows in an airport gift shop on the way over if you have to. You’ll thank yourself later when you get a much better night’s rest because you actually had something to lay your non-swelling head on inside of that warm sleeping bag.
Other Featured Articles in the Climbing Kilimanjaro Series:
Part 1: Climbing Mount Kilimanjaro – The Intro
Part 2: Preparation and Training for Kili
Part 3: Choosing a Climbing Route on Kilimanjaro
Part 4: Essential Gear and Packing List for Kilimanjaro

